

Learning Metal Engraving: Week 2, even 3.
Time is flying by. I’m still working on the panels for the screen, but I’ll write about that separately. I’ve been engraving much more often, though. My original plan was two sessions a week, but that has now become at least four. So I’m spending around an hour a day engraving, apart from weekends. Here’s a small selection of what I’ve managed to do.


The leaf designs are from Sam Alfano’s course. I bought his videos a while ago, and they came with several PDFs. The circles are from there too. I bought some more brass and cut it into 50 × 50 mm plates. And they’re awkward to work with! The plates we used in class were 30 mm across, and I made 40 mm ones at home, but 50 mm feels so far removed from miniature work that I’m completely out of my comfort zone. I can’t explain why. Anyway, I ended up cutting some of the plates in half, giving me 25 mm-wide pieces, which turned out to be just right for me.
The pattern on the plate with the vertical lines and notches is one I stole from class. The trick is to make those notches very neatly, hitting the exact center of the groove without touching the opposite wall. I wrestled with this for several days and, by the end of the second week, I think I’d found a little bit of zen. By the third week, I was getting it right much more often. Plain straight lines are still torture for me, but I’ve made my peace with that. Sometimes I think the problem is the pedal rather than me: the speed occasionally jumps quite abruptly, and I’ve been struggling with that for months now. I still don’t know how to solve it, so I’m training my foot to handle those transitions more sensitively.
My circles are getting a little better. For now, I’m aiming for 50 hours of practice in total before drawing any conclusions. I dread the thought that any of this might be a waste of time. Surely it will help with my woodcarving too… it will, won’t it?
A useful addition to my practice: I’ve started a separate notebook just for engraving. Previously, I only had a sketchbook and a general work notebook. I realized I needed to bring everything together in one place. Putting it together will give me some extra practice and a chance to revisit the theory.
I’m also trying to draw more often again. I’ll have to show you some sketches at some point, just to prove I’m not making it all up. For now, I’m drawing a bit of everything: exercises, sketches from life, ornamental designs, and furniture. I’m muddling along to keep moving and keep my spirits up.
Let’s see what next week brings. I want to make some new practice plates. I’ve already worked through the ones I have several times, and I’m ready for something new.
Learning Metal Engraving: Week 1
Where else should I write about this if not on my own website? After a break of many months, I have returned to learning hand engraving.
It has now been exactly a year since my trip to St. Petersburg, where I took a course in using GRS pneumatic engraving tools. It was an incredibly exciting and productive week. I came home both inspired and somewhat daunted: inspired by the remarkable skill of the school’s instructors, and daunted by the amount of equipment I would need either to replace or acquire.
I am still searching for my ideal setup. I liked the GRS system, but it is expensive, and I am slightly alarmed by the compressor constantly switching on above my head. Yes, the compressor in my workshop sits on a shelf just below the ceiling, directly above my workbench. How do you like that for a setup?
There is also a Russian-made option: Peresedov’s version of the Valtman system, which is what I currently use. I am happy with it in every respect except one: compared with the GRS system, I find the foot pedal rather difficult to control. The GRS pedal seems to respond more smoothly, making it easier to find exactly the right amount of pressure. I do not know how to explain it more precisely—sorry. 🙂
Then there is the PulseGraver, which Roman Butin also uses. It does not require a compressor at all. It seems almost ideal, but it is expensive too, so for now I can only gaze wistfully in its direction. It is sold only in the US. I am not opposed to compressors in principle; I would simply prefer a system that could run with a less demanding compressor setup. I am also looking at Roman Donchenko’s equipment. Naturally, none of these options is cheap, so I need to keep saving my pennies.
Meanwhile, I am working with what I have. To begin with, I went back through the videos I bought last year—the ones by Sam Alfano—which came with PDFs containing designs for practice plates. I found a few more on forums, and asked AI to generate some additional designs in vector format. Altogether, I now have quite an impressive collection.
And then, of course, there is the simple matter of practicing straight lines. What could be easier? Incidentally, it is recommended that you spend 50–100 hours on straight lines alone. In my previous post, I mentioned spending 76 hours on the embroidery, and that comparison really made me stop and think. Fifty to one hundred hours is a huge amount of time!
Anyway, I bought some more brass and cut it into plates. I have already completed several of them, using a 130° graver.


In the photo above, I had just tried sharpening a new graver that morning, while reminding myself which bit needed to be tilted where. 🙂 I have also started gathering all my notes from the course, videos, forums, and books I have read. I think I need to bring everything together in a single notebook somehow, although I have not yet decided exactly how.
I never managed to cut the scroll on the plate because I ran out of time. Altogether, I spent around five hours practicing this week, doing a little at a time before work. I have no particular expectations at this stage. I understand that learning a new skill from scratch is difficult, but even the smallest amount of progress makes me very happy.
At the course, I was enormously impressed by the practice plates with laser-engraved designs—the lines were incredibly fine and precise. I do not have the necessary equipment for that, so I simply transfer my designs with acetone. Unfortunately, I have already damaged some of the grid markings on my cutting mat.
Next week, I plan to resume my daily sketches of scrollwork and my study of ornament, which I was doing while staying at the country house. I also need to keep practicing my sharpening—it seems to be going fairly well.

Embroidery for the Screen
I don’t think I’ve ever really mentioned this before, but the original piece was a fire screen with an embroidered panel. I can no longer remember where I first came across it, and I no longer have any photographs of the original piece—only the image of the embroidery itself. So at the moment, I have absolutely no idea what kind of setting or frame to create for it. I could use metal, wood, carving, marquetry, painted decoration—almost anything. In short, I have plenty to ponder during the long evenings ahead.

What you see in the photo is the result of 76 hours of work. The embroidery is worked on 90-count canvas, which means 90 stitches to the inch. So far, I have completed about 19,960 stitches, while the entire piece will require a little over 43,000. That puts me at 46%.What you see in the photo is the result of 76 hours spent. Embroidery on 90-count canvas, which means 90 stitches per inch. Right now about 19,960 stitches are done, and in total I need to make about 43 thousand and change stitches. In other words, 46% is already finished.
Over the summer, I had a mild bout of panic. You sit at the table for three hours, yet the number of stitches remaining barely seems to change, and there is almost no visible progress. It is incredibly demotivating and frustrating. All you can do is keep going and remind yourself that it only feels this difficult while you are in the middle of it; later, you will look back and smile.
And now it really is getting easier. Almost half the work is behind me, and I already want to make a matching screen—which is an utterly ridiculous idea, because that would mean another 43,000 stitches! Once again, there would be the agony of trying to choose the right colors: making a start, discarding it, and repeating the whole cycle all over again. Then again, perhaps experience will finally make itself useful, and the second screen will be much easier.
All that remains is to find the right subject. Once again, I want something very sweet and floral. We’ll see.
Panels for a Japanese Screen
This could have been the perfect “How I Spent My Summer” school essay! I had plenty of plans for the summer and was once again heading off to the country. Naturally, I don’t have a workshop there. Last year, I took my petit point project with me. I wouldn’t say I did a great deal, but I did make some progress. That will get a post of its own. This time, I decided to take my woodcarving tools as well. In went a jeweller’s saw, needle files, a rotary tool, and an assortment of other small tools. It all fit into two little cases.
My original plan was to work through the lessons in a woodcarving manual from 1909, which I’d found on archive.org back in the spring. I’d usually passed books like this by: too much geometric carving and too many odd projects that had little relevance to my work. This book was an exception, with plenty of practical advice and interesting, unusual lessons and projects that I actually wanted to try. I brought along some ivorywood and pearwood for my experiments. But that’s another story. And, yes, another post.Initially, I planned to work through wood carving lessons from a 1909 textbook that I found on archive.org back in the spring. I used to avoid such textbooks—they had a lot of geometric carving and strange projects that weren’t applicable to my field. This textbook was an exception: lots of practical advice, interesting non-trivial lessons and projects I actually wanted to recreate. For my experiments I brought ivorite and pear wood with me. But that’s not what this is about. Again, I’ll make a separate post.
Besides working through the book, I wanted an actual piece to work on. Something that called for slow, unhurried handwork. Something carved. Or perhaps marquetry. As it happens, I managed to do both, with a few qualifications. Before leaving, I even managed to prepare working drawings for several different pieces. Spoiler: I never started any of them!
Then I suddenly remembered a piece I’d once been completely in love with, but had never dared to attempt. It was a Chinese cabinet, carved from top to bottom. Just looking at it was intimidating! While searching for similar pieces, hoping to find something a little less daunting in scale, I came across this screen. This one was Japanese, made for export. Do I even need to say that I’ll be writing a separate post about that too? I’m keeping the original photo under wraps for now..
What really caught my attention about this screen wasn’t the panels themselves, but the material used to decorate the frames: red urushi lacquer. I could hardly believe my eyes when I saw it for sale on Ozon, our local Amazon. Several colors, too, and even the base lacquer for the first priming coat. Of course, I bought the lot and tried it all out. And yes, I owe you a separate post about that as well.
I had some doubts about the lacquer and how carving it would go. Preparing the frames is a lengthy process, so I started working on the panels at the same time. There will be four panels, with applied carved decoration on both sides. That’s quite unusual for me, since most European screens are decorated on just one side.
The decorative elements on the original piece were made from lacquer, mother-of-pearl, various woods, and ivory. I’d stocked up on a beautiful ivory substitute called Elforyn, so that’s what I used. I made drawings and sketches for the panels, and then it was a matter of getting on with the carving. So far, I’ve managed to make two panels. Here’s how they looked at that stage.

Not everything worked on the first try. I ended up redoing one panel, and I’d still like to refine some details across the whole piece. Once I was back in my workshop at home and looked at a panel under the microscope, my confidence in both my skills and my eyesight began to wobble.
And the most exciting part of this project isn’t even the carving, but that striking background. The plan was to use royal blue. At first, I wasn’t sure it would look right, even though that was the exact color used on the original screen. I took a chance, and I absolutely loved the result.

For some reason, I was very nervous about this project as a whole. It’s quite different from my usual work, and still feels unfamiliar. The carved frames deserve special attention, too. I suppose I’m going through one of those phases in my work where I doubt everything, including my own abilities.
I’m working on the third panel now, with the same motifs: cranes, lotus flowers, and oak leaves. It’s such a lovely, peaceful scene, and I’m really enjoying working on it.
And on the original screen, at least according to what I’ve read, all the carved elements were made separately and attached using the same lacquer as an adhesive. I’m using wood glue 🙂
Miniature Embroidery in 1:12 Scale: Why It Takes So Long
Let’s talk about miniature embroidery.

I recorded a dedicated video on this subject about three years ago. If you watch it, you’ll also see the embroidered upholstery panels for the armchairs I showed yesterday (around 2:13). I briefly explain my choice of threads and needles there, so I won’t repeat all of that here.
Instead, I’d like to add a few things I’ve learned since then.
The first—and perhaps most important—is this:
Embroidery in 1:12 scale is slow. Very slow.
Choosing the Fabric
Let’s start with the foundation.
We don’t use the standard embroidery canvas you’ll find in most craft stores. Instead, we use silk gauze—sometimes sold as silk organza because it is transparent and fairly stiff.
However, ordinary silk organza from a fabric shop usually isn’t suitable for counted embroidery. What we need is an even weave, where every thread is perfectly spaced to create a regular grid.
People often ask whether another evenly woven fabric could work instead.
Personally, I think the answer is yes—but with one important condition.
Try to find something softer and more flexible than traditional silk gauze.
The stiffness of silk gauze is actually an advantage for flat pieces such as fire screens or decorative panels. Upholstered furniture is another story. When covering miniature chairs or sofas, a rigid foundation easily develops unwanted folds and creases. Even silk gauze can be difficult to shape, so choosing the right fabric is worth the effort.
What Count Do Miniaturists Use?
Most miniature embroiderers try not to go below 40-count silk gauze (40 holes per inch). For miniature carpets, for example, 40-count is fairly standard and offers a good balance between detail and the time required to complete a project.
There is also the Miniature Needlework Society in the UK, which brings together enthusiasts of miniature embroidery, knitting, and bobbin lace. I’m not a member myself, but I’ve heard from fellow miniaturists that they generally recognize work stitched on 72-count silk gauze or finer. I can’t personally verify that, though!
That said, I have to admit that embroidery on 72-count—or even 90-count—looks absolutely incredible.
The frustrating part is that photographs don’t really capture the difference. At miniature shows and exhibitions I always found myself staring at embroidered pieces because they’re simply breathtaking in person. In many cases it doesn’t even look like embroidery anymore. It looks like a woven textile made specifically for the furniture.
I’ve seen some outstanding painted upholstery in miniature, and when it’s done in scale it can be wonderfully convincing. But exceptional embroidery has a unique richness that is difficult to imitate. It’s also one of the reasons why furniture upholstered with miniature embroidery is usually far more expensive than painted upholstery.
That doesn’t mean painted upholstery is somehow inferior. Not at all. If it’s executed with the right level of detail and looks convincing in scale, it’s an excellent solution.
Designing the Pattern
In the video I mentioned that I create my embroidery charts digitally.
The programs I use are PC Stitch and WinStitch.
Of the two, WinStitch isn’t my favorite. Large charts can become painfully slow, especially when using operations such as mirroring or cropping.
Today I would add another essential stage to the process: sketching.
I used to make detailed sketches only for marquetry or painted decoration, but once you start working on 60-count silk gauze or finer, preliminary sketches and color studies save an enormous amount of time.
As I mentioned in the video, I always stitch a small test section before committing to the final embroidery. It’s the only reliable way to evaluate color combinations. I wouldn’t skip that step.
And, of course, having a large selection of threads helps enormously.
That’s one of the reasons I still love Chinese silk. It comes in an astonishing range of colors, and when I bought most of mine, it was surprisingly affordable.
Magnification
People often ask what magnification I use.
Most of the time I work with binocular magnifiers.
Recently, however, I discovered something rather amusing.
When stitching on 72-count silk gauze, I don’t actually need magnification at all. I’m quite nearsighted, so before I start stitching, I simply take my contact lenses out.
It works surprisingly well.
I haven’t tried the same trick on 90-count yet—mostly because I need to finish my current project first.
Why It Takes So Long
At the beginning of this article I said that miniature embroidery is slow.
I wasn’t exaggerating.
A single small flower stitched on 72-count silk gauze takes me at least 30 minutes. That’s only about 100 stitches.
Those stitches may involve four or five different shades, which means constantly changing threads, separating individual silk strands, preparing them, and occasionally adjusting the colors as the work progresses.
Interestingly, higher counts make color transitions more subtle, so achieving enough contrast often requires changing the original plan.
Background areas are much faster than floral motifs—but they’re still time-consuming.
Now imagine an embroidery measuring 190 × 190 stitches, and you’ll have a pretty good idea of why these projects take so many hours.
Why I Prefer Fine Counts
So why do I choose such fine silk gauze?
Simply because I love the result.
Higher counts allow for significantly more detail, more sophisticated chart design, and a much more convincing textile effect.
After years of working this way, I’ve also developed a good intuition for matching thread thickness to the fabric, which makes the entire process much more enjoyable.
It’s certainly not the fastest way to embroider miniature upholstery—but for me, the finished result is worth every stitch.
Chippendale Armchairs
Armchair set, finally ready!


In 2018, an exhibition of Thomas Chippendale’s furniture was held in Leeds (I hope I haven’t bored you yet by mentioning this name here and there). Every exhibition usually comes with its own catalog. And I usually buy these. So, in this catalog, there was a wonderful screen that I had already managed to make and sell, and there was also a wonderful armchair with tapestry upholstery. I searched the internet, found a few more not-so-great photos, and decided to tackle a set of two armchairs.
For those who missed it and haven’t read previous posts, let me remind you that this is already the third pair of armchairs. The first two ended up in the trash: the first for its carving and design, the second for its clumsy gilding.

With the current armchairs, everything seems to be fine. I really like the gilding now, the upholstery didn’t cause trouble, and the casters were relatively easy to make, although I did manage to break several 0.5mm drill bits. But these are just part of the process, and I really need to get to the lathe more often and make something else.

And, perhaps, in the next post, I will talk about some nuances of embroidery at this scale.
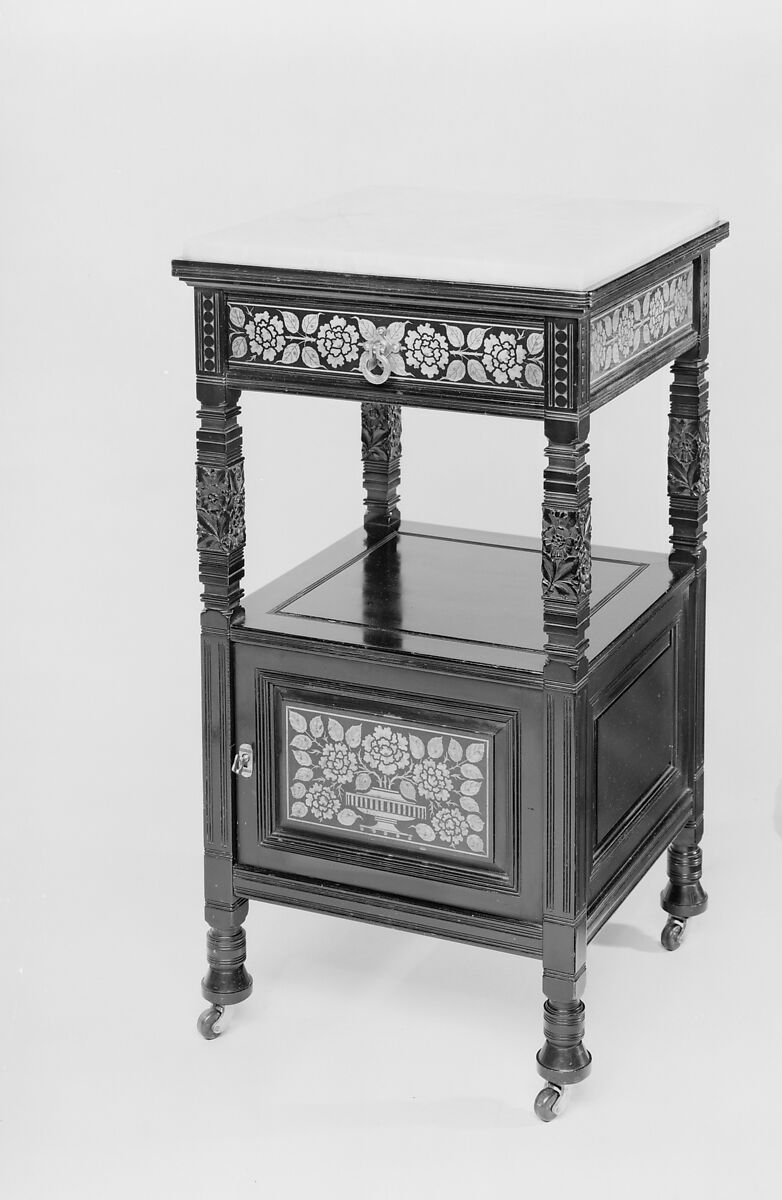
Anglo-Japanese Style Nightstand
This was one of the most interesting projects recently – a nightstand, a companion piece to my long-standing project, a bed in the Aesthetic Movement and Anglo-Japanese style. Generally, the style that the Herter Brothers developed in 19th-century New York. In one of my videos about this project, I already talked a bit about this style. And in the next video, I talked in more detail about the finished project.

So, for my client I decided to make a small series in this style, there aren’t many original pieces, but all of them are beautiful in their own way. A cabinet and an ottoman are in the plans for now.
The nightstand has many notable details: carving on the legs (black hornbeam, by the way), marquetry on the side panels and the table drawer, a working lock in the cabinet, casters with rubber rims. The original top was made of marble, but I made it from a very durable type of plaster.

The most difficult stage in the work, oddly enough, was assembly. I changed the order of operations and redid it several times. My favorite part was making the lock and key, the lock thickness is about 0.7 mm, I didn’t increase the thickness so that, first, it would be easier to install, and second, to stay more or less in scale. The casters are standard, except I added rubber rims, grooves were made in the brass casters themselves for them. It seems like a small detail, but it looks less ordinary.


The prototype nightstand is in the New York MET museum
Finished! The sofa.
IT’S FINALLY DONE! 🪑✨ Meet my newly finished sofa.

I didn’t want to leave the original design — so I changed the proportions completely. Less depth, shorter length. I wanted it to feel lighter, smaller, but still nice and cozy. 
The weaving of the seat took FOREVER.My eyes are tired, but I loved every second of it! Look at that texture! I love the feeling of the finest silk texture.

Now? Deep breath. And then… on to the next project. Because I already have too many ideas floating around. 😅 Tell me — would you dare to weave a whole seat by yourself? 🙌👇
Caned Armchairs

I’ve finally finished this set — two armchairs and a sofa, and my heart is so full.  I first created these pieces several years ago for my very first show in the US, and now I’ve brought them back to life with a slightly new design. It feels so special to revisit them.
Let me start with the armchairs. They’re just as graceful as before, with caned seats woven from the most delicate silk — and sadly, this silk is no longer in production, which makes them even more precious to me.
This time, I painted the furniture with acrylic. For the original set, I used oil. A small shift, but it changed the whole feeling of the pieces.
I’m truly so happy with how they turned out. Next time, I’ll share the sofa — can’t wait for you to see it. 
Французский игровой столик – закончен.
The project I needed to finish two years ago. A French Game Table, the first one went to the auction at IGMA school. I was going to make two of them actually, but I didn’t have enough time to finish it. Besides, I realized that I needed to improve the overall design of the brass mounts, my porcelain painting skills needed an upgrade as well. The inside mount is designed and stitched by me on a 72 count silk gauze. The insert of such a complex form made me cry several times while mounting it, I’m still not very happy about it, but here it is. Sometimes I felt overwhelmed with the whole thing to be honest. I’m happy it’s done. Time to turn the page and move on.


