Making lighting for roombox
Remember that art nouveau roombox that I made some time ago? It was sold but came back to me, because I was asked to make lighting for it. That flower chandelier was made especially for this room. I also needed to make that Tiffany table lamp functional. I decided to try LEDs for this project. They are much brighter and don’t burn out as often as usual bulbs. I was looking for warm light LEDs for quite a while, and I was lucky to find very small (5 or 3mm, I don’t remember) and very cheap ones. So the first problem was solved.
The only problem with LEDs is that you have to find appropriate resistors, so say hello to physics course at school you hated so much. Ohm’s law – I had to look it up in Wikipedia for the first time in so many years. I had the resistors I needed but all this counting, colour code etc. was a bit too overwhelming to me. My husband though was curious enough to find a good video about so called LED drivers that would eliminate my problem with resistors. Here it is – http://www.chipdip.ru/en/video.aspx?vid=ID000306334. To make it easier for you, these LEDs drivers provide constant current of 20 mA in a circuit (most LEDs that I have are 20 mA), so you don’t need to count anything just connect this driver to a simple circuit. It’s very small by the way:
From the left to the right – small case for three drivers, driver itself and driver with small pins to make the soldering easier. So if you lazy to learn all this Ohm’s magic, drivers will save a lot of time for you.
For my chandeliers I used three LEDs, they are very small, so it wasn’t a problem.
One more chandelier
Last time I posted the frame and some flowers for a chandelier, this time the process of soldering:
![]()
I made the roses and leaves with polymer clay, every flower is attached to copper wire. To cover soldered spots I used acrylic paste.
Here is the result:
I totally forgot to show you the original chandeliers that inspired this work. Actually, I saw a lot of them in different antiques catalogs, usually French. But recently I found some Spanish chandeliers, also very beautiful. I also found that some were made with porcelain flowers, some with glass, some flowers were made of copper and brass. Also I saw all kinds of shapes and colors. Just perfect for me !:) Usually I see such chandeliers called Louis XV-style.
Here’s one of the chandeliers I found:

A bit too dark for me, to be honest, but lovely.
I decided to make a central lamp out of bead:
My first choice was the pink one, but later I found that it was too dark for my LED lamp. So I took transparent one.
It was worth it:
And as I used LED light, you can see that it shines only in one direction. Not really good for a room.
So I decided to try this lifehack – super glue and a bit of tin foil. You glue it to the tip of the lamp and here it is – the foil reflect the light, so it looks much better now. You can see by comparing previous photo with the one below. Obviously, the room is darker than it looks on the photo, but the direction of light is well seen. Maybe it’s just my perception, I don’t know 🙂
One more photo:
And about LED lamps, usually I don’t like them at all, most of them give this cold white light, that looks awful. I found some with warm white light, but they were a bit too big for using in miniature. So my husband suggested that we could buy LEDs with wave length= X-0.33. Y-0.36. Don’t ask me what it means 🙂 It’s all my husband ideas, he suggested that such LEDs were neutral white, not cold white. And I think he was right, the one in photos looks “warmer” to me than the ones I have. These LEDs are 5mm diameter.
I liked the result – so I think I’ll keep on looking for small warm-white LEDs.
Flowers
I’m in the process of making flowers for chandelier, also need to make leaves too.
I got the package from US Amazon today with two books – one on metal spinning (need more theoretical ground) and another one on Torchon lacemaking (yeah, I’m a lacemaking addict now). The metal spinning book is fantastic, it’s paperback though with black and white photos, but the contents are great with lots of useful tips and tricks. My husband loved it too, so he tried to make something out of brass. Look good to me!
I really wanted to make some copper pieces, but since I don’t have needed thickness sheets, it will be all about brass, and possibly aluminum soon. Right now I don’t have clear ideas about what I could make, I need to check my antiques catalogs.
Новое
Пока делаю несколько заказов, успеваю делать кое-что из давно запланированного. Я еще в самом начале, но материалы все уже есть, чертежи тоже, так что делай-не хочу. Пока вот стульчик вышел:

Это копия, оригинал опять же сейчас показать не могу, пока не сделаю весь румбокс. 🙂 Как раз тот случай, когда любят говорить “полностью ручная работа”. У меня нет токарного станка, на котором можно было бы делать спиральные ножки, потому вооружилась надфилями и сделала все ножки сама. Ножки из сосны, если что. На все спиральные детали ушло где-то два дня. С обивкой тоже было интересно – был зеленый бархат, а в оригинале нужен не простой, а с полосками, полоски нарисовались текстильными фломастерами. Бахрома сделана из ниток мулине, пришлось вспомнить столь любимую в детстве технику макраме, разве что плести из тоненьких ниточек то еще удовольствие, но 10 часов работы, и готово. Еще предполагались гвоздики, но, смотрю в каталогах антикварной мебели, они были не всегда, теперь сомневаюсь, а нужны ли гвоздики, вроде и так органично смотрится.

Выставка HelloTeddy на Тишинке и новая витрина.
Я всегда удивлялась, когда читала про подготовки к шоу и фестивалям миниатюры, что в самый последний день перед открытием шоу в мастерской царит полный хаос, ничего не найти, полный кошмар. Теперь я поняла, что это такое:) Все-таки месяц на подготовку к выставке это жестоко 🙂
Я только на днях закончила новую витрину и подготовила для нее раму. А вчера уже ездила на монтаж, отвезла только часть мебели (из мебели будет только гарнитур, столик-бабочка да игральный столик на колесиках, остального ,увы, не будет) и румбокс ар нуво, уже сегодня привезу три витринки. Мы находимся в желтом секторе под номером 28, прямо у западного входа (кривая стрелка – это к нам :)). Стенд у нас очень маленький, но, надеюсь, достаточно заметный.

Сама выставка открывается в 12 часов, в остальные дни с 11. Те, кто придут на Тишинку, совершат подвиг, так как в эти холода я сидела бы дома 🙂 Выставка для меня будет, скорее всего последней за последующий год, надеюсь, что, может быть, смогу поучаствовать осенью, посмотрим. Хочу нормально поготовиться, ну и практики мне мало, есть давняя мечта попробовать другие масштабы (и побольше, и поменьше).В общем, приходите на выставку, я буду очень рада пообщаться, и это не пустые слова.
Ок, новая витрина. Продолжаю исследовать старый дом. Сегодня это кусочек гостиной, где только начали готовиться к Новому Году. Сорри, но смогла сфотографировать уже только через стекло, так как жалко было снимать раму.

Старый буфет
Продолжаю “путешествие” по старому дому, сначала было крыльцо, теперь кусочек кухни – старый буфет.

Под катом много фотографий.
Summer News
It’s been a long time since I posted, I got my second diploma, yay!
That’s how my roombox looks now:
Main part is pretty much done, and I also decided to work a bit more on my Russian dollhouse, ugh, there’s lots of work there needs to be done.
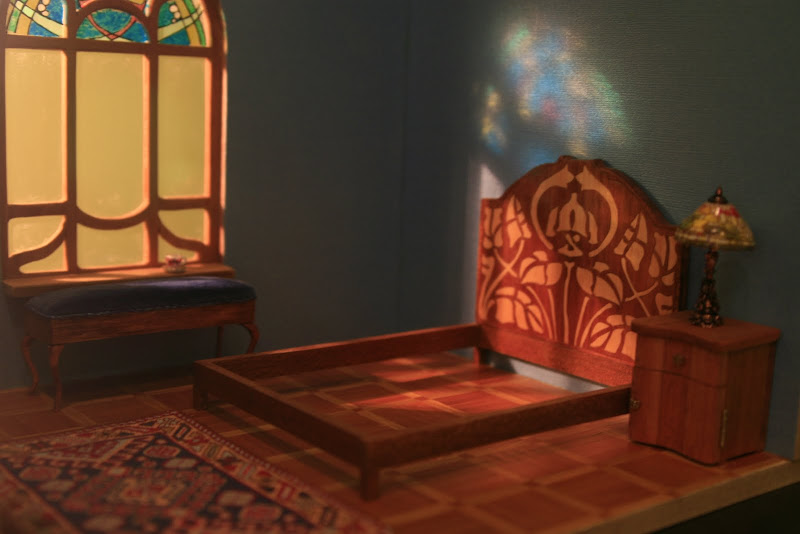
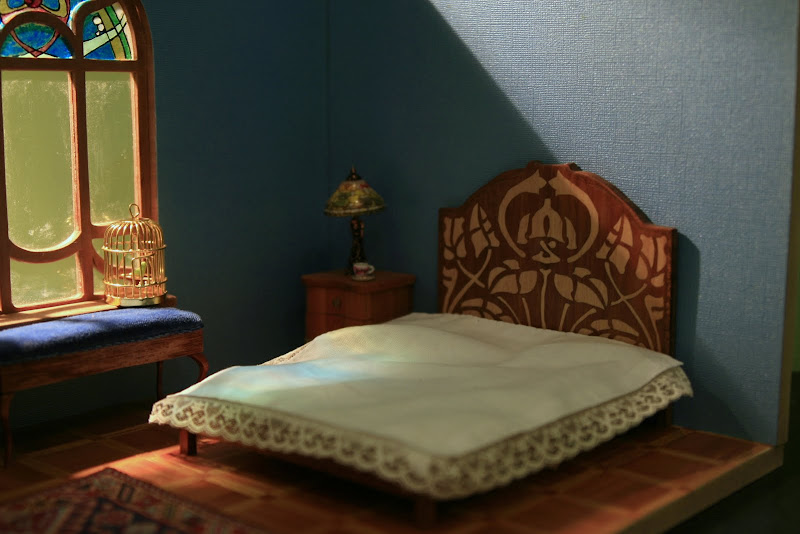
Tiffany Lamp
I’ve finally chosen the wallpaper for my roombox and decided on the main concept of the wall decoration. I’m so excited about it! But before I assemble the roombox I need to fix the lights for it. I hope to make two lamps, one of them should be something like Tiffany:) I actually tried to make couple of them today:
Читать дальше…
Stained Glass Window
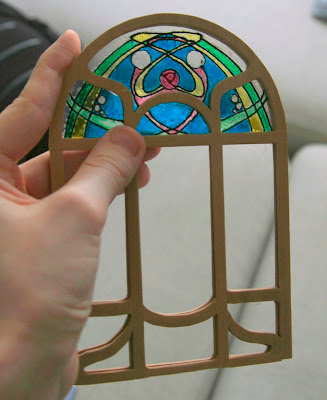
I’ve finished (well, almost ) the window. I haven’t fixed two frames together yet, so the lower part is a bit off. This is the first time I made stained glass window – actually I made two and I cannot choose between them:) The design is mine – I went through some art nouveau stained glass designs and thought it would be reasonable to make my own instead of copying. Now I need to think of the complementary design for the walls. I hope that tomorrow I’ll start working on the furniture for the roombox, I’m still nervous about the whole thing, I love art nouveau too much.
Window – playing around
thought I would never post the parts I was just playing with, but never say never.
Last two days I was trying to find a design for the window, I looked through several books in Russian concerning modern style and also several Flickr groups. Result – hundreds of photos saved, basic concept was chosen.
The walls in my roombox are 1cm thick, so I decided to use walnut, just because it perfectly matched my pattern. It was 2,5mm thick, and I made some mistakes: first of all, I glued the pattern against the grain (hope it’s the right term), and secondly, the walnut I was using was too fragile, and IMO was overdried.So the window was “broken” – it just fell apart. Why, why did I do all this? I have no idea, I knew it wouldn’t work. Besides, I don’t have experience working with walnut, maybe you know – is it the material I’m using or is it about walnut itself? Instead of trying to fix it I decided to use mahogany – I worked with it when I was building the table, so I knew what to expect. And, no surprise, it was okay. I’ve managed to cut the whole window, this time the pattern was along the grain (hope that was my main mistake).

I’m not going to use this frame – now that I know that mahogany is my choice, I’ll start all over and cut the details separately, after that assemble.I need two frames, so it’s a lot of work:)
As you can see, I’m making it in art nouveau style, I feel so nervous about it, this should be my first time experience, and I’m not sure about the result. Hope I’ll make it work.