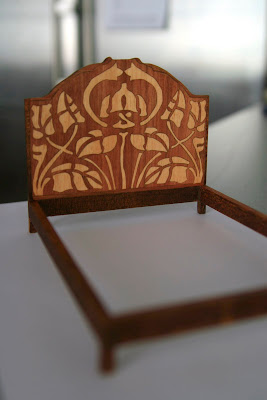
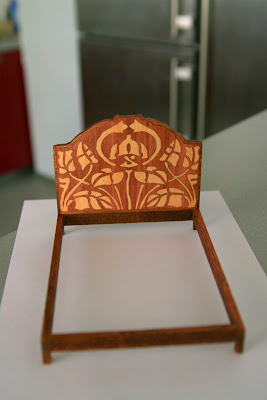
Art Nouveau Bed – done
 |
| From Little Boxes |
 |
| From Little Boxes |
The carcass is ready, now I only need the textile for it. This is the second try with marquetry. Now I like it.:) The whole thing is mahogany.
Tiffany Lamp
I’ve finally chosen the wallpaper for my roombox and decided on the main concept of the wall decoration. I’m so excited about it! But before I assemble the roombox I need to fix the lights for it. I hope to make two lamps, one of them should be something like Tiffany:) I actually tried to make couple of them today:
Читать дальше…
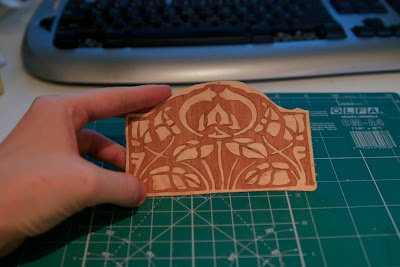
First experience with marquetry
I always wanted to give it a try, so yesterday I took one of the clipart art nouveau ornaments. The result:
 |
| From Little Boxes |
Not perfect. To my opinion – meh:)
But that’s where I love practice, I found out some mistakes that I hope I won’t make in the future – how to cut the pieces, choice of the right glue and finishing. Besides I was too lazy to trace the picture, so the edges are not good.
It was supposed to be one side of the bed for my roombox. The light border shouldn’t be seen actually – I was planning it to be dark. Well, considering the first experience I’m not sure I’ll use this one – I hope to make couple more to make sure it looks good for using with the bed.
Discovering Scale Cabinetmaker
I was lucky to find several issues of Scale Cabinetmaker mag, what a find! So many articles to read, I’m excited!
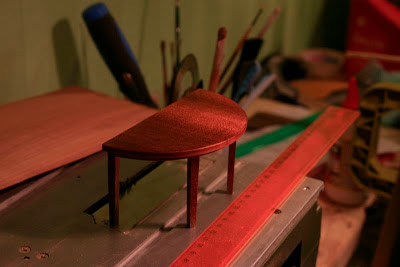
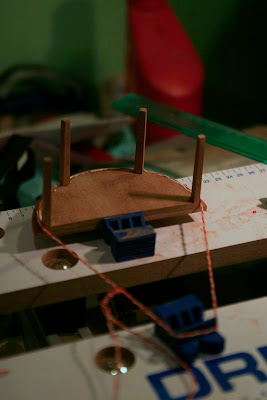
New Table
New table – I didn’t make it!:) My hubby did this table tonight. That’s how beer affects people:) After a pint of beer he decided to make himself busy. The result is below:
 |
| From Little Boxes |
 |
| From Little Boxes |
 |
| From Little Boxes |
To glue the veneer to the table the wire from Cat5 cable was used. I think it’s a brilliant idea.
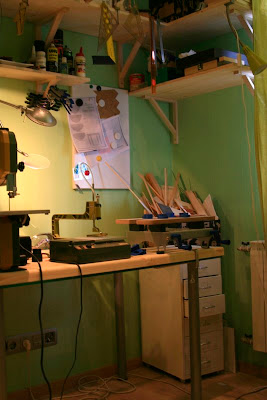
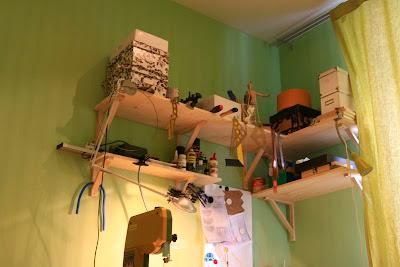
Shelves – my small workshop
I don’t have updates about roombox, but I found some time to improve my working space a bit. Thanks to my hubby I have couple of new shelves. I’m very happy to be honest. The only thing that worries me now is how to manage all the instruments I have – I mean jigsaw, mini lathe, scrollsaw, table saw and little Dremel project table. Mostly they are fixed now, and moving them is a big deal really. So we are thinking of making some sort of “construction” that would make my life easier:)
So many things have changed in less than a year – we moved into the new apartment just couple years ago when I wasn’t mad about miniatures. So we just thought today that if we were moving now, our apartment design would be sooo different – I definitely need more space for my hobby and basically all I can do now is to add some more shelves:) Well, I hope it’s all for the best.
Stained Glass Window
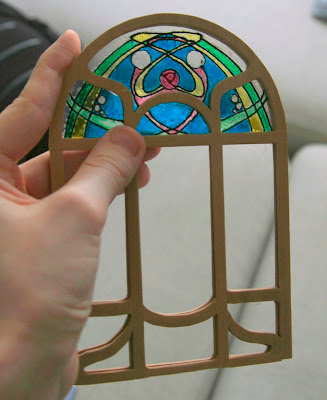
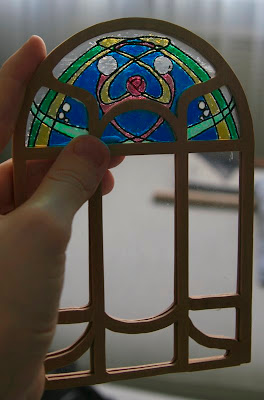
I’ve finished (well, almost ) the window. I haven’t fixed two frames together yet, so the lower part is a bit off. This is the first time I made stained glass window – actually I made two and I cannot choose between them:) The design is mine – I went through some art nouveau stained glass designs and thought it would be reasonable to make my own instead of copying. Now I need to think of the complementary design for the walls. I hope that tomorrow I’ll start working on the furniture for the roombox, I’m still nervous about the whole thing, I love art nouveau too much.
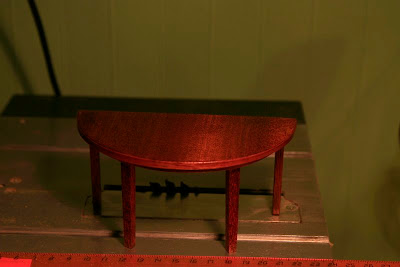
New Table
Here’s the new table that was made this weekend.
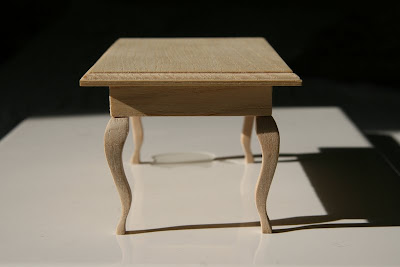
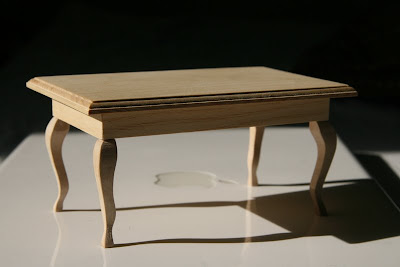
Well, actually I’ve never tried to make cabriole legs before, so it was very exciting experience. The table on the photos is not really sanded and finished. I’ll show you it later.I think it looks very good, considering the fact it was the first time experience with the new jigsaw.
And again, I’m not going to use it in the roombox I’m making. Just for fun!
К вопросу об инструментах и мои любимые блоги.
В разговорах с теми или иными энтузиастами от миниатюры разговор часто, нет, очень часто заходит про инструменты, которые мы используем. Для некоторых это просто самое важное в работе, я читаю огромное количество блогов и знаю некоторых людей (особенно в США – там рынок особенно развит), которые помешаны на различных гаджетах для миниатюры, сами работы уже как бы вторичны, хотя, безусловно, очень талантливы.
Когда я начала делать свой первый румбокс, а потом и второй – у меня из инструментов не было ничего, кроме макетного ножа и огромного ручного лобзика. Я не особо задумывалась об инструментах: сам процесс работы гораздо интереснее, везде можно придумать альтернативу. Оконные проемы получились кривыми, углы не везде прямые, я многого не показываю, но так и есть)) Я не считаю это недостатком, просто надо было стараться лучше!:) Но тогда я мало видела примеров, не совсем понимала, как сделать лучше.
Тем не менее, не было токарного станка – ничего, ножку для стола я купила в магазине за 25 рублей -это была подставка для чего-то, болванка для резьбы по дереву. Не было нормального лобзика – зато всегда есть бальза, пошкурить потом не проблема. Я считаю всегда можно сделать аккуратно при минимуме инструментов. И у меня тогда так и получилось с подарком для мамы.
Это потом уже муж, как любитель попилить-порезать-построить предложил купить первый министанок – мы про них ничего не знали тогда, обо всем я узнавала из блогов на блоггере. Кстати, если интересуетесь – обязательно походите там! Очень много интересного найдете ( список френдов у меня там в левой колонке). Например:
Одним из первых блогеров, которого начала читать была Дебора из Нидерландов, у нее проооосто восхитительные работы.Я уже не помню сколько лет она занимается миниатюрой, но могу сказать, что инструменты у нее есть, из них токарный станок. Но она его почти не использует, а балясины делает вручную, и щедро делится фотографиями:
petitpunt.blogspot.com/2009/09/slow-cooking.html – вот здесь она делает коклюшки, и рассказывает, что делает это без помощи станка.
petitpunt.blogspot.com/2009/08/making-rope-twisted-legs.html – а здесь можно посмотреть как сделать вручную спиралевидную ножку. Все гениальное просто!:)
petitpunt.blogspot.com/2009/07/people-who-read-this-blog-may-remember.html – ну и простой коврик, который она сама вышивала. Тоже общедоступно.
Еще одна девушка из Недерландов Josje – рассказывает, как она сделала зеркало из простых материалов –josje-bouwt.blogspot.com/2009/06/y-esterday-reiko-asked-me-how-i-made.html. У нее же есть сайт с небольшими уроками. Она же проводит мастер-классы по изготовлению мебели, но в ее блоге и так все понятно.
Наконец, третий мой любимый блог – karincorbin.blogspot.com/ – вот тут вы найдете все про те самые инструменты, но опять же ничего сверхъестественного. Кarin много рассказывает о том, как лучше проектировать дом, какие чертежи она делает сама, какой клей лучше, какие у нее инструменты. Вручную она делала украшение для камина из мыльного камня. Рассказывает, как сделала кельтские узоры (там резьба по дереву), тоже все вручную. Ее блогу вот только исполнился год, но, думаю, просто огромное число людей благодарны ей за полезные советы, а она их выдает очень много, я точно в числе этих людей:)
А вот еще Evelien – читаю ее не так давно, но она делает просто чудесные вещи, например, показывает как делала плитку для дома: ejacreates.blogspot.com/2009/11/tiles-and-sofa.html. Впечатлений море!
В общем, подобные ссылки я могу выкладывать сотнями, практически ни в одной нет ничего сложного для исполнения. Конечно, корпеть над мелкими деталями нелегко, это не такое простое занятие в целом, но если есть большое желание, то альтернатива всегда найдется. Главное, терпение, особенно если хочется сделать аккуратно.
Я все мечтаю рассказать про одного миниатюриста, который делает мебель уже много лет. Вот там немного сложнее, но опять же сплошная ручная работа. Но об этом отдельно:)
Window – playing around
thought I would never post the parts I was just playing with, but never say never.
Last two days I was trying to find a design for the window, I looked through several books in Russian concerning modern style and also several Flickr groups. Result – hundreds of photos saved, basic concept was chosen.
The walls in my roombox are 1cm thick, so I decided to use walnut, just because it perfectly matched my pattern. It was 2,5mm thick, and I made some mistakes: first of all, I glued the pattern against the grain (hope it’s the right term), and secondly, the walnut I was using was too fragile, and IMO was overdried.So the window was “broken” – it just fell apart. Why, why did I do all this? I have no idea, I knew it wouldn’t work. Besides, I don’t have experience working with walnut, maybe you know – is it the material I’m using or is it about walnut itself? Instead of trying to fix it I decided to use mahogany – I worked with it when I was building the table, so I knew what to expect. And, no surprise, it was okay. I’ve managed to cut the whole window, this time the pattern was along the grain (hope that was my main mistake).

I’m not going to use this frame – now that I know that mahogany is my choice, I’ll start all over and cut the details separately, after that assemble.I need two frames, so it’s a lot of work:)
As you can see, I’m making it in art nouveau style, I feel so nervous about it, this should be my first time experience, and I’m not sure about the result. Hope I’ll make it work.