Wardrobe shelf
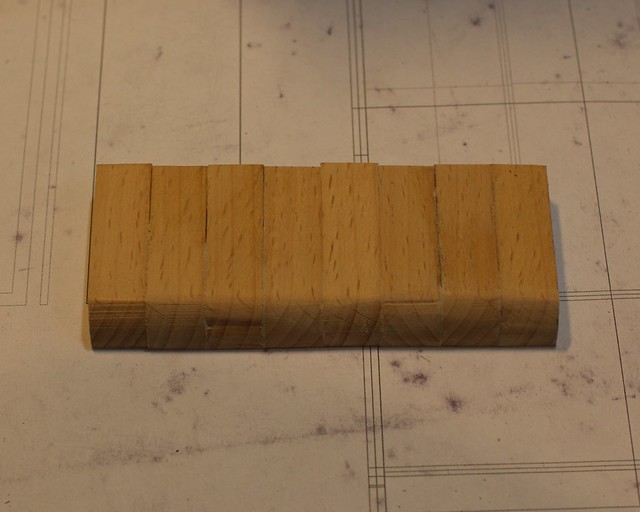
Today was about making a shelf. I needed to bend veneer sheets for it. But first I made some sort of pattern. I took quite thick piece of beech scrap wood and cut the same pattern several times, then I glued all the parts together.
Proxxon planer review.
I got this surface planer as a birthday gift from my husband, I also have just a planer from Proxxon too, but sometimes you just need one perfect side, especially when the material is not perfect. I had to work with imperfections with my hand plane, but basically I don’t have enough space for it. Besides some woods are very hard to work with, so this planer is my savior.
Well, here it is:
Scalpel blades.
I was lucky to find a website selling scalpel blades and scalpel handles in Moscow. Usually such companies don’t sell anything to mere mortals, only clinics and doctors. Not this time. I got these:
- No. 11, I used all the blades I had, was one of my favorites some time ago.
- No. 10, love them!
- and my new favorite – 15c, love them even more! 🙂 It’s much smaller than No. 10, so it’s pretty cool for tiny cuts.
I also got three handles, just couldn’t resist, they were too cheap.
About the quality, 15c is the best IMHO, and it turned out, that it was from Netherlands (Steeluxe brand), 10 and 11 – from Germany.
Dutch Table. Poor man’s lathe duplicator.
It’s been a while since my last post, most of my work now is commissions. that I cannot show till December, sorry. I hope that in few months I’ll be able to show it all in details. I haven’t worked on my art nouveau cabinet since August, mostly because it was hard tget used to the fact that I have a baby girl, and she doesn’t really like all the noises from tablesaw and such. Then I started learning Rhino 3d program, later SolidWorks. I was so into Rhino that I actually design all the furniture pieces in it, Sketchup had to go 🙂
Well, back to work. In my last post I wrote about Dutch table that I made for commissioned roombox. So I’ve changed it, completely. The decoration part were scaled down a bit, the shape of the leg is different now. Usually I don’t mind making such changes, but this time it was very hard – it’s almost depressing to have to change things, when you have a baby (ugh, those sleepless nights:)), and I don’t have grandmas and grandpas to help me out, and you have to go back and start from scratch. grrrr. But there was no choice, the form of the legs was bad. I started with 3d model, here it is:
New commission – table WIP
As a part of the commission I had a table. Now it’s a good time to show you a couple of photos of the process of making it. Initially I was going to use mahogany for it and even made a table top and blanks for the legs, which I’ll show you below, but later on the plans got changed and I remade everything from cherry wood. Don’t be surprised 🙂
Router Fence – Theory and Practice
In my last post I showed you my new custom router fence. Later I got a request in comments to tell more about use of such fences. I feel a bit intimidated to write about it in English, because you can find plenty of information about jigs and tips in English, but almost none in Russian. So this post will be short 🙂
This is one of the crucial jigs for the routers – you can make moldings, rabbets with it, so you don’t need to clamp the part. You’ll also need the fence when you work with small parts.
I have two routers, the first one (I also made a custom fence for it):
Commissions and new router fence.
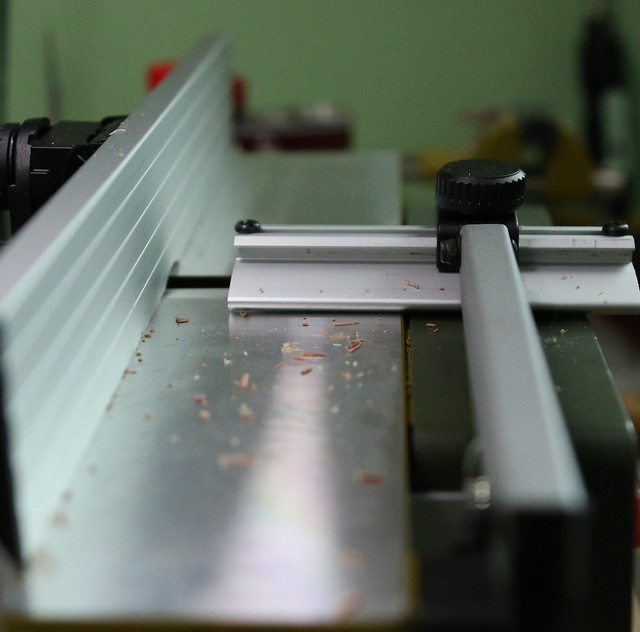
Some time ago I made a post about a router and a self-made wooden fence for it, (it was three years ago, time flies!) Well, not much has changed since that time, the only thing that became worse, was the fence itself. In the place where the fence and the router bit meet you could see uneven ends. So when you were working with tiny moldings, the accuracy of the the work suffered very much. My husband offered me to make a metallic fence for the router, and here’s the result:
It’s a bit taller than the wooden one, but you can change the width of it, so you can fit any router bit neatly. The view from behind, it’s very easy to remove it.
Shopping therapy
I just love buying new tools and materials, it gives your so much joy and inspiration! My long awaited package from UK with bones:
Loved the color, and immediately tried to cut and carve it, got some interesting results.
Shopping Spree
Last week was a bit busy and strange, but I’m slowly getting back to work. And I’m really happy about it!
About 2 or 3 weeks ago I bought lots of stuff for my minis. As usual, you go some place and you take a list, just to remind yourself that you don’t need anything extra. Of course, you need. You’ll need this chisel and this little thing, how could you live without it?
That’s how I go shopping 🙂
Last time I was going for furniture wax, wood blocks, veneer and japanese water stones.
Japanese water stones are number 1000 and 3000 – work great with 3mm and more chisels and knives, I wouldn’t try them with my micro chisels – still using Arkansas stone for that.
Wax and patina:
As for now I tried only wax – really liked the texture and smell.
Some new chisels – it’s my hubby’s fault. I honestly didn’t want to buy them, but he insisted. When we came home and I tried them I was really sad that he didn’t insisted on several more. They are really really good, though made in Russia. I also got some wood blocks, I’ll need them for a future project.
And something for dessert. Veritas hand plane. Some time ago my hubby was all in woodworking stuff, so he was desperate to buy one of these planes, but something was always in the way. Besides they are not that cheap. Later he moved on to metalworking and it all was forgotten.
So when he saw this plane on a shelf waiting for its new owner he offered me to get one. I wasn’t really enthusiastic (well, they are still expensive) – but in the end I gave up. I think it’s a good investment, besides I always keep hand plane and a shooting board next to me, it’s a very nice set of tools in everyday work. I bought it and don’t regret it.
Besides, we got small but nice discount. Some things are worth it.
Proxxon planer review
This planer was, I think, the last item on my wish-list. It always seemed a bit expensive to me, besides I used to buy pre-cut veneer, so there was no need to buy it back then.
A bit later I bought a second band saw for cutting lumber, made my first sand planer (Cap. Obvious tip – I used wood lathe to make it). The only thing I didn’t like in it – was the amount of dust, you always have to keep your vacuum next to it turned on, and it wasn’t really useful when you needed to plane thick board. So, several months ago, I finally decided to try this mini planer from Proxxon.