

One more chandelier
Last time I posted the frame and some flowers for a chandelier, this time the process of soldering:

I made the roses and leaves with polymer clay, every flower is attached to copper wire. To cover soldered spots I used acrylic paste.
Here is the result:
I totally forgot to show you the original chandeliers that inspired this work. Actually, I saw a lot of them in different antiques catalogs, usually French. But recently I found some Spanish chandeliers, also very beautiful. I also found that some were made with porcelain flowers, some with glass, some flowers were made of copper and brass. Also I saw all kinds of shapes and colors. Just perfect for me !:) Usually I see such chandeliers called Louis XV-style.
Here’s one of the chandeliers I found:
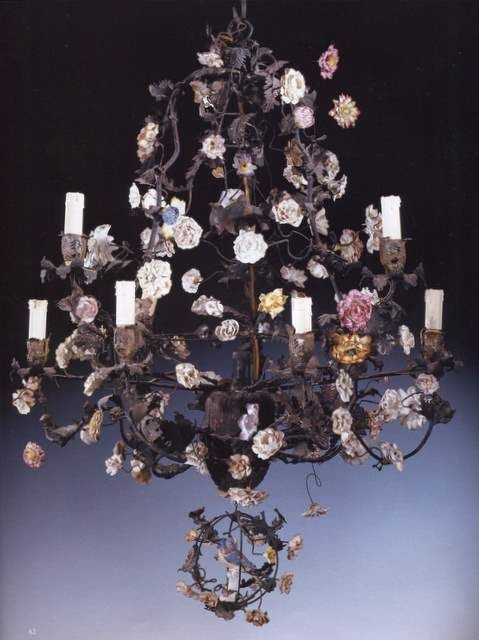
A bit too dark for me, to be honest, but lovely.
I decided to make a central lamp out of bead:
My first choice was the pink one, but later I found that it was too dark for my LED lamp. So I took transparent one.
It was worth it:
And as I used LED light, you can see that it shines only in one direction. Not really good for a room.
So I decided to try this lifehack – super glue and a bit of tin foil. You glue it to the tip of the lamp and here it is – the foil reflect the light, so it looks much better now. You can see by comparing previous photo with the one below. Obviously, the room is darker than it looks on the photo, but the direction of light is well seen. Maybe it’s just my perception, I don’t know 🙂
One more photo:
And about LED lamps, usually I don’t like them at all, most of them give this cold white light, that looks awful. I found some with warm white light, but they were a bit too big for using in miniature. So my husband suggested that we could buy LEDs with wave length= X-0.33. Y-0.36. Don’t ask me what it means 🙂 It’s all my husband ideas, he suggested that such LEDs were neutral white, not cold white. And I think he was right, the one in photos looks “warmer” to me than the ones I have. These LEDs are 5mm diameter.
I liked the result – so I think I’ll keep on looking for small warm-white LEDs.
Flowers
I’m in the process of making flowers for chandelier, also need to make leaves too.
I got the package from US Amazon today with two books – one on metal spinning (need more theoretical ground) and another one on Torchon lacemaking (yeah, I’m a lacemaking addict now). The metal spinning book is fantastic, it’s paperback though with black and white photos, but the contents are great with lots of useful tips and tricks. My husband loved it too, so he tried to make something out of brass. Look good to me!
I really wanted to make some copper pieces, but since I don’t have needed thickness sheets, it will be all about brass, and possibly aluminum soon. Right now I don’t have clear ideas about what I could make, I need to check my antiques catalogs.
Miniaturas Magazine
To all who subscribed to my site updates through email – sorry for Friday spam. I’ve been translating and moving some old posts from my English blog to this one. I totally forgot that I needed to disable my “Follow” plugins.
The good news this week – my first Miniaturas magazine arrived yesterday. I’m totally thrilled, I had couple of issues found on Picasa, some through my friends in Spain. I really wanted to subscribe to this wonderful mag, as it proved to be one of my favorite. The only problem was – my Spanish not that good, not good at all. Oh, and there was another problem – no digital subscription. That’s what was stopping me actually. But when one of my English mags subscriptions expired I immediately thought of Miniaturas. It was worth it in the end.
The cost is about the same as some English mags, but the quality is beyond compare really. I love it to bits! 🙂 I expected to receive one issue, but I got two actually! What a great surprise!
The quality of paper, photos is a-ma-zing. Period. Usually I skip through the pages quickly to discover only one or two articles worth reading, but this time I enjoyed every single page.
And a little present for me 🙂
The best way to learn Spanish, don’t you think? 🙂
It’s not that bad after all
With the help of my fellow bloggers, I did it! Brazing is much easier for me, after several hours of practice. I’m almost happy with this frame and plan to make couple more, just need to finish sketches.
Here’s one of the epoxy roses that I made, not sure about using them though, maybe I should add more color, crystal clear look a bit plain to me.
Glass beads for miniature lights
Last week I received a package with lace bobbins (50 pairs), they were all unspangled, so I went to the nearest beads shop to buy some beads. I love this place, lots of cute things, I cannot leave it without buying something. I found these wonderful glass beads, but they are not for bobbins, I’m afraid.
As these two weeks were all about making lights I immediately thought these beads would make perfect lamp shades. You would just need to cut them in half.
I googled at first to find someone who did it before but to no avail. So, here’s my first try.
You need Proxxon/Dremel/whatever tool, diamond wheel and sticky tape. Glasses for protection and mask is a must for me too. I also marked a cutting line on the bead.
Here’s how you need to fix the bead on a tape:
And just cut it off! 🙂 At first I thought that glass would break, but I was lucky, the edge is even. You can also sand the bead to make it even better 🙂
Nice one:
I’m very excited about it,there’s lot of beads with different sizes and shapes, lot’s of things to explore.
All in progress
I should have put another title to this post, something like “Ugly Photos’ Post”, but nevermind.
I had a strange week, I actually did a lot of things, but seems like I don’t have much to show to you. I’m still making the parts for my chandelier, another one. I also continue learning metal lathe things. My husband is a great teacher, very patient, I should say. I did learn a lot, but still have to ask him if I have any questions.
As a result I made a beautiful candlestick, made of aluminum, but it looked very silver to me 🙂 Unfortunately, no photos for you here as it broke when I started cutting it off. The good thing is that I learned a lot, I also tried that mysterious jig for making spheres (absolutely, useless by the way for aluminum, because it’s easier to make them with files).
Experiment number two – metal spinning. Looks fantastic in this video, which is not mine, obviously 🙂
I don’t have silver, but lots of copper. I’m not very good with spinning, I managed to make these, hm, “cups” after five or six attempts.
.
I’ve finished with the first floor, and cannot be happier! Good to move on to the upper floor – just three doors, two windows and three ceilings left. Here’s how my living room looks like:
I didn’t make the plinth, because I want to install a fireplace first. The windows are made of mahogany, they don’t open, but in my case it’s all been planned 😉
The ceiling is very simple, nothing fancy, I guess, because of the wallpaper, that takes too much attention.
Under the windows you can see my second version of poppy table, this time, again, it was a commission piece, so I’m thinking of the third version for myself. 🙂
Some goodies arrived this morning for my handmade lights, hopefully I’ll try to make them (at least, start) this weekend. If I’m lucky with it, I can also start working on the exterior.
Friday!
It’s sooo good to be back to work on my dollhouse! I’ve finished the main door today:
I didn’t make a door knob for the inner side of the door just yet, it will be there soon, I promise 🙂
Victorian Style
I would never consider myself as a huge fan of Victorian style, probably because I haven’t seen the examples that would look just right for me. And this time I think I’ve found some. One of my latest commissions:
Entrance door – not done yet
Well, it’s not completely ready, I need to carve the back sides of the panels and add some more details. But, so far so good, I like this door. On the left is a photo of the doors that inspired me to try this design. The door handle is supposed to be quite simple here, but there’s no place for mail slot, though I’ve seen some very original solutions for such doors.
I really like the color of the cherry wood: