

Tea o’clock
I can’t stop playing with all those minis I bought recently:
Wood carving tools sharpening
I’m in the middle of uphoslering the chairs, looking good so far. But today is all about sharpening tools.
The biggest fan of sharpening is my husband, but I still have to do that quite often, every other week usually.
My tools set:
Morris Chair
I started a new project from Scale Cabinetmaker magazine – two Morris chairs. I couldn’t find the right prototype on Internet, but you’ll get the idea, I hope.

bombe Chest – Done
One more commissioned piece is done. I only managed to make several photos of it.
It’s funny but the projects that look difficult are quite easy to make. Well, that’s how it works for me, at least. The drawers were easy to form, claw foot was also a simple task, I had enough practice with the previous piece as you can remember. 🙂
I made the inner parts out of mahogany as well, don’t know why, I guess I just love the color of it and thought it would look very nice. And it does, actually.
As for the hardware, this time I had to use the handles from Houseworks, I’d rather use the ones from Phoenix Model Developments, but there wasn’t the right size and from, I managed to use them only for the top drawer here. The back was trick, as you form the sides manually, with Dremel and bandsaw, so you spend a lot of time fitting it, the pattern won’t do here.
Despite its looks – it’s very light and you almost don’t feel it on your hand.
I actually love the mahogany covered with shellac, to me it’s so much nicer than cherry wood, though my husband thinks otherwise. The surface is so shiny and smooth under shellac. With so much practice I finally can achieve such results with French Polish.
I guess it won’t be the last bombe chest that I made, I’d love to have a similar one for my dollhouse.
First Fitting
I started making drawers, at first I cut them out with band saw, then sand with Proxxon rotary tool.
New Old Bombe Chest
My first bombe chest has found the new owner already, so I’m making the new one! Don’t ask me why, I don’t know personally. But my husband is a huge fan of such chests, so he challenged me to try to make a bit more difficult shape. I have to shape not only the sides of the chest, but the drawers too.
This model is from the old Popular Woodworking issue. I loved the article. I was surprised that such chests were much more popular in US rather than UK. I also found that in Europe the carcases were made of several glued up pieces and then veneered. In US, woodworkers worked with solid wood.
So I’m making it American way. To cut out the pieces I’m using a bandsaw.
Then the long hours of sanding and final shaping. I hate working with makore, but the color of it and the grain is so beautiful that I simply can’t resist it. It’s so much better than cherry wood or pear wood for me. The only drawback – I have to wear a mask.
After couple of hours:
Now for the top and the bottom, I need to sand it a bit more.
Next time – all the inner parts.
Making lighting for roombox
Remember that art nouveau roombox that I made some time ago? It was sold but came back to me, because I was asked to make lighting for it. That flower chandelier was made especially for this room. I also needed to make that Tiffany table lamp functional. I decided to try LEDs for this project. They are much brighter and don’t burn out as often as usual bulbs. I was looking for warm light LEDs for quite a while, and I was lucky to find very small (5 or 3mm, I don’t remember) and very cheap ones. So the first problem was solved.
The only problem with LEDs is that you have to find appropriate resistors, so say hello to physics course at school you hated so much. Ohm’s law – I had to look it up in Wikipedia for the first time in so many years. I had the resistors I needed but all this counting, colour code etc. was a bit too overwhelming to me. My husband though was curious enough to find a good video about so called LED drivers that would eliminate my problem with resistors. Here it is – http://www.chipdip.ru/en/video.aspx?vid=ID000306334. To make it easier for you, these LEDs drivers provide constant current of 20 mA in a circuit (most LEDs that I have are 20 mA), so you don’t need to count anything just connect this driver to a simple circuit. It’s very small by the way:
From the left to the right – small case for three drivers, driver itself and driver with small pins to make the soldering easier. So if you lazy to learn all this Ohm’s magic, drivers will save a lot of time for you.
For my chandeliers I used three LEDs, they are very small, so it wasn’t a problem.
One more chandelier
Last time I posted the frame and some flowers for a chandelier, this time the process of soldering:

I made the roses and leaves with polymer clay, every flower is attached to copper wire. To cover soldered spots I used acrylic paste.
Here is the result:
I totally forgot to show you the original chandeliers that inspired this work. Actually, I saw a lot of them in different antiques catalogs, usually French. But recently I found some Spanish chandeliers, also very beautiful. I also found that some were made with porcelain flowers, some with glass, some flowers were made of copper and brass. Also I saw all kinds of shapes and colors. Just perfect for me !:) Usually I see such chandeliers called Louis XV-style.
Here’s one of the chandeliers I found:
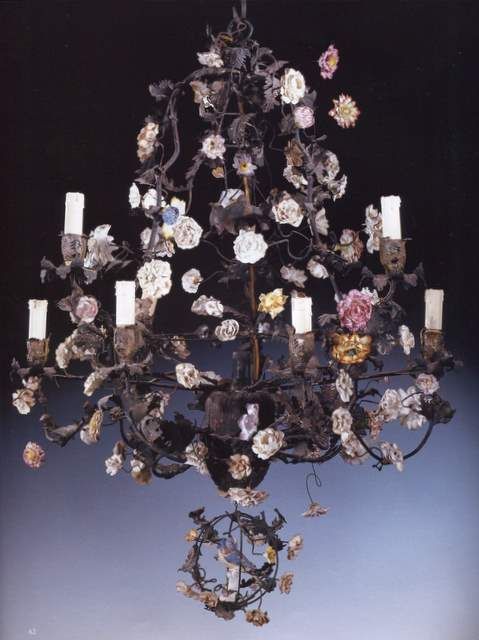
A bit too dark for me, to be honest, but lovely.
I decided to make a central lamp out of bead:
My first choice was the pink one, but later I found that it was too dark for my LED lamp. So I took transparent one.
It was worth it:
And as I used LED light, you can see that it shines only in one direction. Not really good for a room.
So I decided to try this lifehack – super glue and a bit of tin foil. You glue it to the tip of the lamp and here it is – the foil reflect the light, so it looks much better now. You can see by comparing previous photo with the one below. Obviously, the room is darker than it looks on the photo, but the direction of light is well seen. Maybe it’s just my perception, I don’t know 🙂
One more photo:
And about LED lamps, usually I don’t like them at all, most of them give this cold white light, that looks awful. I found some with warm white light, but they were a bit too big for using in miniature. So my husband suggested that we could buy LEDs with wave length= X-0.33. Y-0.36. Don’t ask me what it means 🙂 It’s all my husband ideas, he suggested that such LEDs were neutral white, not cold white. And I think he was right, the one in photos looks “warmer” to me than the ones I have. These LEDs are 5mm diameter.
I liked the result – so I think I’ll keep on looking for small warm-white LEDs.
Flowers
I’m in the process of making flowers for chandelier, also need to make leaves too.
I got the package from US Amazon today with two books – one on metal spinning (need more theoretical ground) and another one on Torchon lacemaking (yeah, I’m a lacemaking addict now). The metal spinning book is fantastic, it’s paperback though with black and white photos, but the contents are great with lots of useful tips and tricks. My husband loved it too, so he tried to make something out of brass. Look good to me!
I really wanted to make some copper pieces, but since I don’t have needed thickness sheets, it will be all about brass, and possibly aluminum soon. Right now I don’t have clear ideas about what I could make, I need to check my antiques catalogs.